Patrick O'Banion
Project Description
In this project, me and my partners created a 4x4x4 LED cube and performed a cost analysis on the cheapest options to build the cube. The cube utilizes multicolor digitally addressable RGB leds to allow the cube to change colors. The cube was attached to an ESP8288 microcontroller in order to control the lights. Four physical buttons were used to switch the cube betwwen presets.
Skills used in project
- Design of the circuit, and an optimal way to control each LED individually
- Cost analysis used to select our specific parts
- Aruino programming to set the LEDs to different colors and configurations
- Physical construction of cube mainly through the use of soldiering

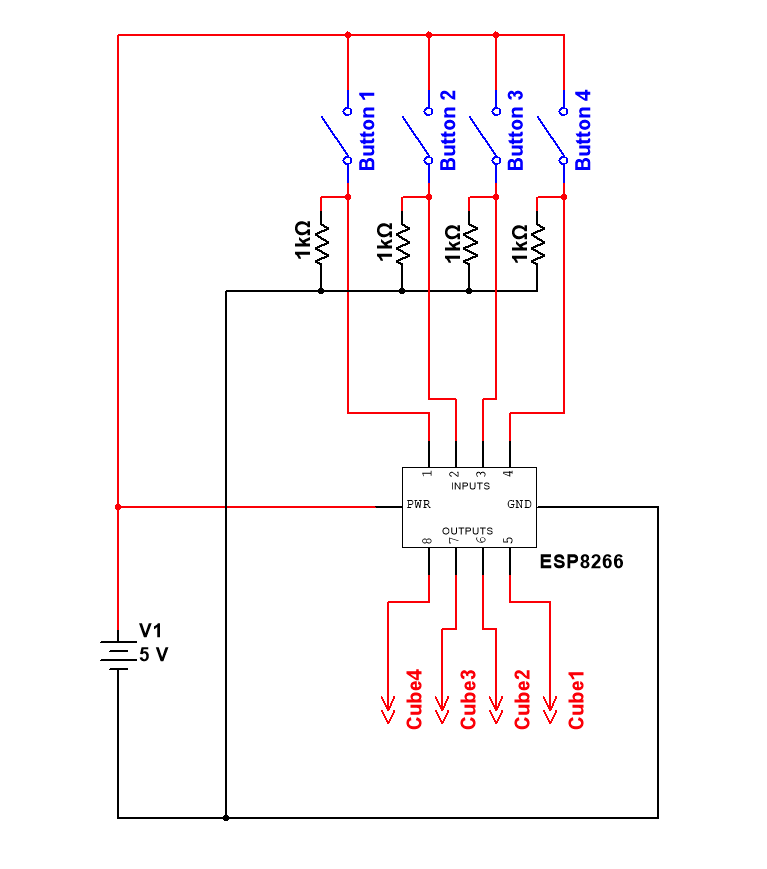
Figure 1: Main circuit diagram, showing the connected power source, and switches

Figure 2: Circuit diagram illustrating the first row of LEDs connected to the ES388
The first choice we had to make when designing the cube was what type of LED we wanted to use. We decided to go with the PL9823 LED chips because they allowed each pin to be controlled individually and digitally for a total cost of $17.92. While the analog rgb LEDs were cheaper at a cost of #13.31, they would have greatly increased the complexity of our circuit. The PL9823 chips could be connected into a chain, with one main input channel that could send the signal digitally for which LEDs to turn on. If we had chosen to go with the analog solution then each LED would require four seperate wires ran to each LED for red, blue, green, and ground. Each individual wire would then need to be connected to a seperate port on the microcontroller, for a total of 256 output ports.
We next had to chose between microcontrollers. The 2 main choices were the Arduino Uno and ESP8266. We decided to go with the ESP8266 because of the lower cost, as well as the added benefit of havig built in WIFI. The one downside of the ESP8266 was that the output pins did not give a high enough voltage. We first tried using a LM741 OP amp but after intial testing we found the slew rate was not fast enough, so we decided on the LM7171.

Figure 3: Image of assembled LED cube with all lights turned on
Table 1: Cost of each component
| Part | Price per Unit |
|---|---|
| Arduino Uno | $15.99 |
| Arduino Uno with WIFI | $18.99 |
| ESP8266 | $8.79 |
| LM741 | $.65 |
| LM7171 | $2.81 |
| 10[KΩ] resistor | $.48 |
| 1[KΩ] resistor | $.12 |
| 500[Ω] resistor | $.12 |
| PL9823 LED | $.28 |
| RGB Analog LED | $.12 |

Figure 4: Demonstration of the individually addressable LEDs, cube is displaying the letter K
The total cost to build the cube was $35.10 before tax, not including the breadboard as a base, and the cost of the solder and tools. While we did not utilize the built in WIFI on the ESP8266, the microcontroller was still cheaper than having used an Arduino. The WIFI also allows for future capabilities for the cube to be controlled over wifi, all that is required is additional coding.